

The Flame Fades. The Vessel Remains.

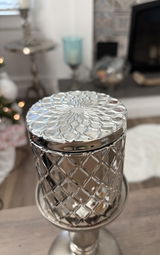
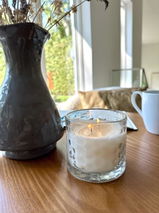
At ELDé we believe that luxury extends beyond the flame. Our carefully crafted candle vessels are not only designed to hold our premium candles but are chosen specifically because they are too beautiful to discard once the candle has burned down. Each vessel is a work of art, with unique patterns, vibrant colors, and intricate finishes that make them an elegant addition to any room in your home.
Once the candle dims, these stunning jars can be repurposed in countless ways, continuing to add charm and function to your space. They’re not just containers—they’re lasting keepsakes, made to be cherished long after the candle has gone out.
Ideas For Reuse
Holder for Small Candies: Fill your vessel with individually wrapped chocolates or small candies to create a chic treat station on your coffee table, perfect for entertaining or enjoying a sweet moment at home.
Jewelry Holder: Keep your rings, necklaces, and other trinkets organized and beautifully displayed.![]()

Storage for Luxurious Essentials: Elevate your space by using the vessel to store beauty tools, like makeup brushes, cotton swabs, or facial rollers. It’s the perfect way to display your luxury skincare and personal care items with elegance, turning everyday essentials into a sophisticated part of your decor.
Mini Terrarium: Fill it with succulents or small plants to create a serene green space.
Elegant Desk Storage: Use the vessel to store pens, paper clips, or other office essentials in style. It is an easy way to add a touch of luxury to your workspace.
Candle Refill Kit (Coming Soon): We are excited to introduce a candle refill kit designed specifically for your ELDé vessel. Reignite the luxury of your favorite scents with a convenient, eco-friendly refill, available soon for continued enjoyment. Each refill will feature the precisely measured ingredients specific to your ELDé vessel, ensuring a flawless, even burn every time.
We carefully select each vessel to ensure it’s not only a stunning candle holder but also a functional piece that can continue to enhance your home décor. Your candle’s vessel is meant to live on, elevating your space while being part of your sustainable journey.

Reed Diffusers: Long-Lasting Luxury, Refillable
Our reed diffusers are the perfect way to enjoy continuous fragrance in your home without the need for a flame. And the best part? They are fully refillable! Once your diffuser has run low, you don’t need to purchase a completely new one—you can simply refill it with your favorite scent. Plus, when not in use, the elegant glass vessel doubles beautifully as a bud vase for fresh or dried flowers.
How to Refill Your Reed Diffuser
Select a Refill: We offer a selection of fragrance refills in the same luxurious scents as your original diffuser. Choose your favorite, or switch things up with a new scent!
Pour the Refill: Remove the reeds and pour the fragrance refill into the vessel, ensuring you don’t overfill it.
Replace the Reeds: For the best experience, we recommend using fresh reeds with each refill. You can also reuse the existing reeds if they’re still in good condition.
Enjoy the Fragrance: Place the reed diffuser back in your favorite spot and enjoy the long-lasting scent once again!
Our reed diffusers are designed to be a sustainable luxury that you can continue to enjoy without the need for constant replacements. With refill options available, you can keep the beautiful vessel and fragrance flowing for as long as you'd like.
How To Clean Out Candle Jars
Cleaning out your candle jar properly ensures you can reuse it for other purposes. However, please note that some of our luxury candle jars are painted or decorated on the inside, and it's important to handle them with care to avoid damaging the finish. Here are the steps to clean your jar safely.
Freezing Method
Freeze the Wax: Place the jar in the freezer for 2-3 hours. This will harden the remaining wax, making it easier to remove. Once frozen, gently lift the wax out of the jar. Avoid using sharp objects to scrape it off, as this can scratch or damage the interior paint.
Remove Wick: After removing the wax, check the jar for any leftover wick remnants. These can be carefully pulled out by hand. Do not use sharp tools to scrape them off to protect the finish of the jar.
Wash the Jar: Fill the jar with warm, soapy water and let it sit for a few minutes to loosen any remaining wax or residue. Use a soft sponge or cloth to gently clean the inside of the jar. Avoid using harsh chemicals or abrasive scrubbers, as they can damage the painted surface or decorative finishes.
Polish: For an extra shine, you can use a mild glass cleaner or a mixture of water and vinegar to polish the outside of the jar. However, avoid using these on the inside if your jar has delicate paint or decoration to prevent fading or peeling.
Dry Thoroughly: Once clean, let the jar air dry completely before reusing it for other purposes. Be sure to avoid any moisture in the jar if you plan to use it for candles or storage.
Heating Method
If you prefer to heat the jar instead of freezing it, follow these steps to safely remove the wax, wick tab, and any adhesive residue while protecting the jar's finish:
Preheat the Oven: Preheat your oven to a low temperature, around 170°F (77°C). This low temperature will soften the wax without risking damage to the jar or its decorative finish.
Place the Jar in the Oven: Set the jar on a baking sheet lined with aluminum foil or parchment paper (to catch any melting wax). Place the jar in the preheated oven for about 10-15 minutes. The heat will soften the wax, making it easy to pour out.
Remove the Jar Carefully: Once the wax is melted, carefully remove the jar from the oven using oven mitts. The jar will be hot, so handle with caution.
Pour Out the Wax: While the jar is still warm, pour the melted wax into a disposable container or a cup to let it solidify. NEVER pour wax directly into the sink, as it could clog the drain.
Remove the Wick Tab: After the wax has been removed, you'll likely still see the metal wick tab at the bottom of the jar. To remove it, gently twist it off using a pair of pliers or a flat tool. Be gentle to avoid damaging the jar’s bottom or any painted finishes.
Remove Sticker Adhesive: If your jar has a sticker label or adhesive residue on the bottom, soak the area with warm soapy water for a few minutes. Then, use a soft sponge or cloth to gently scrub away the adhesive. For any stubborn adhesive, you can use a small amount of vegetable oil or rubbing alcohol on a cloth to dissolve it. Avoid harsh chemicals or scrubbing too hard, as this can damage the jar’s finish.
Clean the Jar: After removing the wax, wick tab, and adhesive, wash the jar thoroughly with warm, soapy water. Use a soft sponge to clean the inside and outside, taking care not to use anything abrasive that might scratch or damage the jar’s surface.
Dry Thoroughly: Let the jar air dry completely before reusing it for other purposes. Ensure there is no lingering moisture inside if you plan to use it for candles or other storage.
Important Notes
Avoid High Heat: Do not use high heat (over 170°F) as it could cause the jar to crack or damage any paint or decoration on the inside.
Do Not Use a Direct Flame: Avoid using a direct flame, such as placing the jar directly on the stove or over an open flame, as this can be hazardous and may damage the jar.
Caution with Decorative Jars: If your jar has delicate paint or decoration on the inside, be extra cautious to ensure the heat doesn’t affect the finish.

Recently viewed products
Let customers speak for us
This candle smells so good!!! I can’t stop burning it. Will be back for more.

By far the best candle I’ve ever owned!
I rarely endorse products, but I just had to share .
I literally gave up on real candles because my personal experience was that too many were often overpowering and artificial smelling.
I’m addicted to this Eldé Home Collection brand.
My most recent try, Whimsical Morning Bliss- it smells like Fruitloops…the perfect addition to my mourning routine! My favorite smell ever!
Oh, and the reusable jar is gorgeous and an added bonus!
The glow from the candle is so beautiful and I love the scent!

The scent is pleasant and not overpowering, love the container quality, also the candle burn very evenly.

love to literally this everyday especially next to a fire

The combination of the lavender and the vanilla are my two favorite scents and together they are perfect. I love my candles. Will definitely order again

The smell is incredible and the vessel is beautiful. I love my candles. I bought extras to keep in hand as gifts.
This candle is seriously as beautiful in person as it is in the photos!! I got the Coastal Essense scent. I can confirm it's clean, fresh and relaxing. All together creates a luxurious vibe. Looking forward to adding others and trying the diffusers too!
The smell of the candle is smooth and relaxing. The jar it comes in is beautiful and I will absolutely re-use it when the candle is finished.


loved the candle and diffuser, diffuser provides just enough ambiance to the room without being overpowering, definitely ordering more for the bathrooms
